Showing posts with label Recipe. Show all posts

Friday, January 30, 2015

Extra Crispy Pork Chops

This recipe is one of our favorite ways to make pork chops. I love beef, I don't love chicken. Pork is the healthy alternative for our household.

Overall I think the pork chop gets overlooked. Everyone thinks of bacon and sausage when they think pork. A think chop is really one of my favorite cuts of meat to prepare though. It's very versatile, lean, and super easy. Plus- today's pork market is ultra safe. The risk of trichinosis only exists in free-range meats so your standard butcher-counter chop can safely be cooked to medium. No dried out meat!!

This recipe is an adaptation of an adaptation of the America's Best recipe (you need to be a subscriber to read the recipe). I like America's Best but often times the super-precise recipes aren't the most practical for everyday cooking.

Start with 4 pork chops of equal thickness.

Line up 3 bowls: 1 with flour, 1 with the egg mix, 1 with the bread crumb mix. The egg mix is very, very thick but trust me. It works.


Dip the chop in the flour, then the egg, then the bread crumbs. You're baking the pork chops on a greased cooling rack over a baking sheet.

Bake at 425 for 17-25 minutes or until done. These stay super moist but they can get dry if you really over-bake them. Remember pork can have a tinge of pink in the middle and still be safe!

I made these with Parmesan garlic spaghetti squash, salad, and rolls. Yum! I traditionally serve them with the Parmesan crusted potatoes au gratin because the creamy sauce on the potatoes goes well with the crispy of the chop. The spaghetti sauce concoction was equally yummy though!


Extra Crispy Pork Chops:
4 pork chops of equal thickness (I like a 6 ounce chop but you can really use any cut you want, just mix more breading layers if you need more for more chops)
Bread Crumb Mix-
3 1/2 cup panko crumbs
1 tbsp dried chopped onion
1 tbsp garlic powder
2 tbsp grated Parmesan
1 tsp thyme
2 tbsp parsley
Egg Mix-
3 egg white
3 tbsp Dijon mustard
3 tbsp flour
Flour-
6 tbsp flour

Mix your dipping bowls thoroughly. Dip chops in flour, then egg, then bread crumbs. Make sure to coat the sides! Bake at 425 till done.

Wednesday, January 28, 2015

Parmesan Scalloped Spaghetti Squash

A friend of mine made my first spaghetti squash back in the fall. She brought a cheesy kale dish made with it and I loved it. Coach wasn't a fan but he thought it was the sauce.

So normally when I make our favorite ultra-crispy pork chops, I make Parmesan scalloped potatoes to go with it. This time I decided to change things up and use a spaghetti squash dish instead.

I basically made a sauce like from the potato dish and stirred it in with the squash and all the cheeses. Then I baked the whole thing to hot and bubbly.

Once again, phone pictures because that's all I have around when I think about pictures!

I sliced the squash in half and use a spoon to scrape out the seeds and loose gunk (pumpkin style). I placed the halves cut-side down in a baking dish with about an inch of water. Then I baked it at 350 for 45 minutes until the skin was blistering. Take it out of the oven and let it cool just enough to handle. Use a fork to scrape out the insides into spaghetti like strands. I placed the strands in a buttered glass baking dish.
 I'll be honest- I could stop here and just eat it with salt and pepper. I love this stuff. But I stuck with the plan and started a Parmesan sauce.

I stirred up a roux with equal parts butter and flour and about 2 cloves of minced garlic. I added milk and cream and whisked until the roux was all dissolved. I sprinkled in a liberal amount of thyme, Parmesan, a cracked black pepper. Picture of the roux was all I got for you (I was in a rush folks, dinner had to be ready by the time Coach came home!).
 I poured the sauce over the squash and stirred in more mozzarella and Parmesan. Then I sprinkled even more cheese on top and popped it back in the oven at 350. The squash holds on to the yellow color pretty strongly so it's not the white cheesiness that the potatoes have. Plus, you know, camera phone.
All in all, it was good. I took all the leftovers and just ate them for lunch. :) Coach tolerated it and ate a big helping but he still wasn't the hugest fan. It was improved, but still not ranking high up his list.

Let me know if you make it any better!!

Monday, January 12, 2015

Easy Pizza Crust


I've mentioned several times making home-made pizza. If we don't order from Papa John's, it's because I'm cooking that night. This dough is super easy and really delicious. No picture this time (not that they're any good anyway).

Ingredients:
1 1/2 cup flour
1 Tbsp baking powder
1/2 tsp salt
1/4 tsp garlic powder
1/2 cup water
2 Tbsp olive oil

Directions:
Preheat oven to 450
Combine the dry ingredients, combine the wet ingredients, then stir together.
You might need to add more water or need in more flour depending on dough consistency.
Roll out dough to desired shape and size. Dough will double in thickness when baked so be careful not to make too thick.
Place dough on desired baking sheet, dock with fork (that means poke holes all over that thing so you don't get giant air bubbles).
Bake for 5 to 10 minutes to set the dough, the crust should be hard but not brown.
Remove from oven and add desired toppings.
Return to over and bake until crust is golden brown and toppings are cooked as desired.

Easy right?! I double the batch and make a large thick-crust pizza on our pizza stone. I just roll the dough out right on the stone too. We load up ours with cheese, red and green peppers, onion, hamburger, and mushrooms. I'll tell you now, the secret to a loaded pizza is to put a layer of cheese over the sauce, then all the other toppings, then another light sprinkling of cheese.

Also-if you want a stuff crust pizza, just roll out the dough past the edges of the baking sheet. Then sprinkle your cheese liberally on the edge and roll in the dough to encase it. Do this prior to the first baking obviously.

Enjoy!

Saturday, January 10, 2015

Chili Contest 2014


Every year at work I host a chili contest. Host is a loose term. I really just keep track of the contestants and eaters, split up the prize money, and since we're the FCS classroom, all the crockpots and eating takes place in there.

Normally I make 2 chilis each year- one on my dime and one on the FCS department dime. Perks of the job. This year I just didn't have time or the heart really, so I just made mine. Last year I won the contest with the Thick and Meaty. I could have stuck with that but instead I went for my easier classic chili. The recipes originally from Paula Dean but of course I've changed it some over the years. This chili won 3rd place about 3 years ago.

Now remember that chili is a subjective dish. So I'm only giving you approximate quantities. You can change out ingredients and spices to make it however you wish!! Excuse the crappy pictures but the SLR battery was dead so point & shoot had to do. Not to mention the worst lighting ever in our kitchen.

Start by browning your beef- I used plan old hamburger, 2 lbs. I season mine lightly as I cook it. I also cook it in the stock pot I'll use for the whole recipe. Why wash 2 dishes?! Our hamburger is pretty lean so I just let the fat cook off some and not bother with draining it later. Obviously draining it would be healthier.
 Step 2: add in your diced veggies. I used onion and green bell pepper. You can throw in some jalapeno or red pepper too. In this case, 1 large onion, 2 green peppers. Oh, and some minced garlic. I used garlic salt on the hamburger so I didn't add too much.
 Step 3: Canned tomato time! The original recipe wants 2 14-oz cans of Mexican-style stewed tomatoes. I have two problems with this: 1) stewed tomatoes are pretty big tomato hunks, and 2) I've never found Mexican-style ever in the store. So I used 2 cans of stewed tomatoes with peppers and 2 cans of diced tomatoes. I still went through pulling out the big tomato pieces and cutting them up smaller. I just don't like giant tomato hunks.
 Step 4: beans and seasonings. 2 15-oz cans of kidney beans. I like color variety so I did one can of light and one can of dark. Oh, and drain and rinse those beans before you add them. That bean juice is thick and gross in my opinion. Then 1/4 cup of chili powder and a couple tsps of salt. Sprinkle fresh ground black pepper according to your preference. You can also add a splash of cayenne and paprika but remember both of those spices (and cumin) are ingredients of chili powder (chili powder is a combo spice).
 Stir and simmer and taste test till you get it just right. The picture makes it look real orange, but it's a true chili red (gets it from the chili powder).

This size batch fills a large crockpot and feeds 8-10. Normally I make this size then immediately freeze half for Coach and I to have later in the winter. Why cook twice when you can cook and freeze once?!

Thursday, December 11, 2014

B&Gs

This might shock some of you, but I never ate biscuits and gravy till high school. I was one of the managers for our wrestling team and there was a St Louis tournament we went to every year (Marquette for you St Louisians). They served biscuits and gravy at their concession stand and one year that was all they had left. Even the pizza was sold out. I was STARVING. So I could eat the hot biscuits and gravy or a cold sandwich and an apple out of our wrestling team's food stock. I went for the B&G.

Fast forward 8 years and I can still count on two hands how many times I'd had the dish. Here was the thing, most restaurants had gravy that was too watery or too pasty. And most people I know made the stuff from a bag. So I decided to go ahead and have my students (aka me) learn to make it from scratch. The result? The most delightfully easy and taste B&G recipe around. I keep a tube of sausage on hand at all times just in case we need a meal in a pinch. All the other ingredients are standard stuff you'll always have in the pantry- well at least I have it in mine.

First make the biscuits:
  • Mix 1 cup of flour with 1 1/2 tsp baking powder and a pinch of salt.
  • Then cut in a small teaspoon of butter (you can make this a tablespoon).
  • Stir it up with 1/2 cup milk. Voila- a mushy gooey drop biscuit batter.
  • Plop it onto a baking sheet lined with parchment paper and pop into an oven at 450 degrees (I make as many blobs as people, so usually 2-4).
  • Bake for 10-12 minutes till the bottoms are golden brown.

While the biscuits are baking, you make the gravy:
  • Cook your sausage on medium heat (6) in a deep skillet. Don't get your sausage too brown, just cooked through. If you brown it, you've really burnt some fat and your gravy will be brown instead of creamy white.
  • Add another tablespoon butter and melt with the sausage (don't drain that meat fat, that's the flavor for your gravy!).
  • Stir in 3 tablespoons flour till everything's all absorbed. You've essentially made a roux with sausage in it now.
  • Gently pour in 1 3/4 cups milk and 1/2 tsp pepper. Add a pinch of salt. Keep that stove on 6!!
  • Stir and scrape the bottom of the pan to make sure nothings scorching. Eventually it will come to a simmer.
  • Keep stirring and let it simmer for 3-5 minutes till it thickens up to where you like it. Remember it will thicken some more upon standing.

By this time you're biscuits should be coming out of the oven, your gravy should be ready, and you've got nothing to do but eat your hot biscuits and gravy! All in all it takes me about 15 minutes to make is hands down one of my favorite recipes. You'll never use gravy from a mix again! (Though I want judge if you use refrigerated biscuits for a large crowd).

Wednesday, November 26, 2014

Sicilian Supper


Also called Poor Man's Lasagna.

No pictures- tell Coach I really need that new lens for my camera! So use your imagination here. I also don't have exact measurements. This is one of those family-learned dishes that you just make.

Ingredients:
Egg Noodles- about 2/3 of a big bag.
1 stick cream cheese
1-2 cups milk
~1/2 a container of grated parmesan
1 jar spaghetti sauce
1 lb hamburger

So here's where I blow your mind: cook the hamburger (season how you want) and mix it up with your sauce. Then cook the noodles. I leave the noodles a bit more al dente since you'll be baking them in more liquid. That's like a second cooking, so leaving them firmer keeps the noodle from getting too mushy during the whole process.

As for the white sauce- you need to melt the cream cheese on a medium heat in a sauce pan with about 1 cup of milk. I use a whisk and patience for this. You want the cream cheese all combined and melted nice and smooth. Then add in your parmesan cheese- whisk till smooth! Ok, so here's where the whole do-it-how-you-think's-best bit comes in. You need to taste your sauce and decide how 1)cheesy you want it and 2) how thick you want it. I usually add a bit more parmesan and a bit more milk because I don't like the tartness of cream cheese. I like a more mellow sauce. You also need to salt and pepper at this point (something else I don't do since I salt and pepper my meat and I hate dishes being over-salted). You can garlic here as well (something I do since I love garlic). It's really your sauce, make it what you want!

Now for assembly: stir together your white sauce and noodles and layer those in a buttered 13x9 pan. I heavily butter but you could use olive oil spray if you care about your health (something I'm rarely cognizant of when making pasta). Then you spread your meat/red sauce combo on top of that. Sprinkle more parmesan on top and bake at 350 till hot and bubbly! You can also freeze it at this point. I like to make double batches, eat one then and freeze one for later. It's also my standard someone-died-or-someone-had-a-baby-or-someone-is-sick-take-these-people-a-meal meal.

You can also add in a layer of shredded parmesan and mozzarella between the noodles and red sauce, or use mozzarella on top. Once again, make it what you want.

I like this dish because it's cheap and easy. I get our hamburger from those super-generous parents (they buy a whole cow and just distribute the meat at will, we get all our red meat free from them because they rock like that). I use $1 red sauce and off brand everything else. About $5 for the white sauce ingredients, $1.50 for red sauce stuff, then if you add more cheese maybe $2 more. $2 for the noodles usually. So that's like a 10 buck meal that can feed 6-8. Done!

Thursday, January 16, 2014

Parmesan Crusted Potatoes Au Gratin

There is nothing wrong with the title of this post just like there was nothing wrong with the recipe. Naturally I didn't follow it. In fact I don't even have the original link. It was so simple I just did it.

Slice your potatoes (I left skins on) thinly, of equal thickness. If you have a mandolin- use it. I didn't and mine turned out just fine.

Heat a cup or so of heavy whipping cream on low heat in a saucepan. Stir in some fresh or dried rosemary, some fresh or dried thyme, and little nutmeg. Add those seasoning to your preference. I did equal rosemary and thyme (maybe a teaspoon of the dried stuff?) then just a pinch of nutmeg. Simmer so the flavors mix.

Butter a pan they make a layer of potatoes. I made mine overlap each other. Pour some of the cream mix over the potatoes. Liberally sprinkle grated Parmesan cheese over the top with a bit of salt and pepper. The idea is that the cream dampens the potatoes so the cheese sticks.

Do another layer the same way, then another, and another till you're out of potatoes. Pour the remaining cream mixture all over the top. I also added a bit of shredded mozzarella to every other layer just to increase the cheesiness.

Cover the pan with foil and bake at 350 for 40-50 minutes or until potatoes are tender. Remove the foil, put a fresh layer of Parmesan on top and return to over. Let the thing bake till the cheese on top is melted and lightly browned.

I served mine with some ham and steamed green beans. Delightful!


Wednesday, December 11, 2013

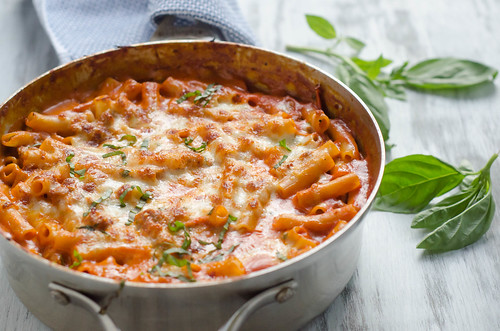
One-Pot Baked Ziti


Mmmmmm yum. I love pasta, and I also love the 5 cheese baked ziti at Olive Garden (classy, I know). So when I saw this recipe, I was really excited to try it out. The original came from Pinterest of course :). You can get the original link here. Me being me, I had to change some things, though not many.

Source

One-Pot Baked Ziti

¾ lb sweet Italian sausage
4 tsp minced garlic
1/4 tsp red pepper flakes (or more or less to your taste)
sea salt and black pepper
1 (28-oz) can crushed tomatoes
4 tsp basil leaves (dried)
3 cups water
12 oz penne noodles
1/2 cup whipping cream
1  cup Parmesan cheese + ¼ c for topping
1/4 cup chopped fresh basil
1 cup shredded mozzarella
  1. Preheat your oven to 475
  2. In your dutch oven (or other oven safe pot that can comfortable hold ~5 quarts), brown the sausage. Add the garlic and red pepper and give it all a good stir for a minute or so. *Note, use less/more of all these seasonings according to your preference
  3. Add the tomatoes and use them to deglaze the pan. Stir in the basil with a dash of salt and pepper and let it simmer gently for about 10 minutes. It should reduce down just a smidge (just enough to really meld and bolden the flavors).
  4. Stir in the water and pasta and increase your stove temp so the liquid comes to a near boil. Let the pasta cook 10-15 minutes, you want it to still have a bit of crunch because it will continue cooking in the oven.
  5. Remove from heat, stir in the whipping cream and parmesan. Taste your sauce and adjust the seasonings as needed. Get it all good and blended then sprinkle the mozzarella and parmesan on top.
  6. Pop it in the oven for another 15 minutes and let the cheese get good and melty (I like mine browned a bit). Serve and enjoy!
*You'll notice I call the dish ziti and actually have penne in the ingredients. A noodle's a noodle, use what you want. I didn't have the ziti I wanted so I used penne which is way easier for me to get anyway.

Some things I do to try to healthen it up some- I use whole grain or omega-3 pasta noodles. I'm also going to sneak attack Coach and season up some ground turkey instead of the sausage. I don't care too much for sausage anyway (ha-ha, get your laughs out now) so I'm anxious to try a different meat (and more laughs).


Monday, December 9, 2013

Puff the Magic Pastry


So in my foods classes at work, we cover a pastry unit. We had previously done 3 different labs- beef empanadas where they made their own pastry dough from scratch, mile high peanut butter pie where they make a crumb crust for a crème pie, and apple turnovers using a store-bought puff pastry product (with filling from scratch of course).

Well those store bought puff pastries are not cheap and the budget has been very tight this year. We always pride ourselves in giving our kids high-quality labs. This is the basic culinary arts class after all. We're going to be as healthy as we can, as tasty as we can, and we avoid "cooking from a box." So it made sense for us to drop those store-bough pastries and make our own.

Because the pastry dough has to chill overnight, we had a 2-day lab. Kids already have to peel and slice their apples the day before so we weren't adding time onto the calendar or anything. Overall things seemed to go OK today but the true test will be tomorrow when the pastry dough bakes! I'll let you know how it goes. In the meantime, here's the recipe:

Simple Puff Pastry:
2 cups flour
1/4 tsp salt
3 1/4 sticks cold butter (that's 1 1/2 cups plus 2 tablespoons)
3/4 cup ice cold water

Mix the flour and salt then cut in the butter. Work quickly so the butter doesn't get too warm, you want it to stay in solid clumps when working the dough. Stir in the water with a fork until everything is moistened. The dough will be very sticky.

Turn the dough out onto a well-floured surface. Pat it into a loaf then roll out into a rough rectangle. Fold it in thirds like you were folding a brochure. This creates the layers. Pick up the folded dough and rotate it, making sure to re-flour underneath so it doesn't stick to the counter. Roll it out again into the rectangle shape. Then fold again. Repeat this roll and fold process about 5 times before finally folding it into a tidy little brick. Wrap in saran wrap and let chill a minimum of 2 hours. Bring the dough out again and repeat the roll and fold another 3 times. Then you can roll the dough out to use as needed. It should bake at 425 degrees.


Thursday, October 24, 2013

Chili Champion!

In my early years at my job, I thought it would be fun if the school had a chili contest. So I organized one, naturally. At that time though I didn't eat much chili (it was a new acceptance for my palate) and I had never made it before. Maybe shocking for a FCS teacher organizing a chili contest but whatever.

3 years later and I have claimed the crown for my own! I have tried numerous chili recipes over the time but ultimately the BBQ beef chili (entered in the contest as "Thick and Meaty") was the one to bring me the crown. Literally, a crown.


The original recipe comes from here and is as follows. I of course made changes because I am the worst at just following a recipe. So I made my notes on the bottom about what I did different. Hopefully it makes sense, otherwise good luck, it'll probably taste good no matter what!


BBQ Beef Chili

Ingredients

For the Pulled Beef:

  • 1 2.5-3 pound beef chuck roast
  • 3 tablespoons dijon mustard
  • 1/4 cup brown sugar
  • 2 teaspoons salt
  • 1 teaspoons cayenne pepper

For the Chili:

  • 2 tablespoons olive oil
  • 1 onion, chopped
  • 1 green pepper, chopped
  • 1 jalapeno pepper, seeds and ribs removed, chopped
  • 2 tablespoons garlic, minced
  • 2-2.5 pounds ground beef
  • 3 tablespoons chile powder
  • 3 teaspoons salt
  • 1 teaspoon cayenne  (plus more, if desired)
  • 3 cups pureed tomatoes
  • 1/2 cup tomato paste
  • 1/4 cup brown sugar
  • 2 tablespoons apple cider vinegar
  • 2 tablespoons worcestershire sauce
  • 1 tablespoon dijon mustard
  • 1 cup beef stock or water (plus more, if a thinner chili is desired)
  • 2 cans kidney beans, drained

Directions

Prepare the pulled beef barbecue. (This step can be done a day ahead, if desired.) Preheat oven to 325 degree. Massage the chuck roast with mustard, brown sugar, salt, and cayenne. Place the roast in a covered, oven-safe pan. Cook for 2.5 – 3 hours, until it pulls apart easily with a fork. Remove from the oven to cool slightly. When cool enough to handle, use a fork or your fingers to “pull” the meat into shredded pieces. Discard any excess fat. Set aside or refrigerate for chili.

***

In a large pot, heat olive oil over medium heat. Add the onion and peppers. Cook for 3-5 minutes, until slightly tender. Add the garlic. Cook for a few minutes more. Add the ground beef and cook until completely brown, using a spoon to break it up as it cooks. Once the ground beef is fully cooked, add the chili powder, cayenne and salt. Stir to combine. Cook for a minute or two. Add the pureed tomatoes, tomato paste, brown sugar, vinegar, worcestershire sauce, and mustard. Stir to combine. Add the pulled beef. Cook for about 5-10 minutes, until all ingredients are heated through and the flavors have mingled. Add the kidney beans and beef stock. Add more stock if a thinner/brothier chili is desired. Simmer for about 5 minutes. Taste and adjust the seasoning with more salt and cayenne, as desired.

***

Top with chopped green onions and cheddar cheese and serve with a side of cornbread.
 
 
What I Did Different:
 
·        I did not make a roast- I just used the Hormel beef Roast Au Jus stuff. It’s in the deli section usually and you microwave it. Tastes great and super fast.
·        I did not use the same meat quantities. I used one pack of the beef roast and 2 to 2 ½ lb of ground hamburger.
·        I doubled the amount of beans and used a combo of light red and dark red for color change up.
·        I added lots of black pepper, at least ½ tsp, some salt, and maybe another ½ tsp of red pepper. I thought it needed more “kick.” You might try more chili powder or cumin too but totally to your preferences.
·        I didn’t use beef broth, just water and beef bouillon cubes. It adds some saltiness that way. All in all I had to dilute this A LOT, the original is very very thick. Thin it out as much as you want. Just remember to add another bouillon cube for every 1-2 cups of water you add.
·        To also thin it out more, I used 3 cans  of crushed tomatoes (oh ps, I bought cans of crushed tomatoes and didn’t puree my own, 2 cans is about the 3 cups the recipe calls for).
·        The tomato paste amount is equivalent to 1 small can.
·        Next time I will do 2 green peppers, I like lots of color in my chili and I thought the pepper got lost, but that’s a personal preference thing. Another jalapeno would also help with color and add more of that "kick" I think chili needs to have.



Friday, October 11, 2013

Egg- the Great Emulsifier


My students had their first cooking lab last week. They made chocolate chip cookies. One of my more observant students commented, er shouted really, "Hey I didn't know cookies had eggs in them!"

What?! Where have you been child? We just finished the unit where we talk about not eating cookie dough because of the RAW EGG. How did you miss that cookies have eggs in them? Maybe he/she was really confused during that lesson.... So I figured I ought to cut the kid some slack and accept that maybe they don't know because they don't know why.

So for those of you who don't know. Eggs are used in baked goods. Eggs are emulsifiers, that means they hold things together. Most often, they hold together oil and water. Here's a diagram:

Philic means to love things and phobic means to hate things. So the hydrophobic side repels water, hence why oil and water don't mix. But if you add something, say an egg, to the mix, then the emulsifier will be the connection between the oil and water and hold them together.

It's the glue folks. It's what holds it all together. It's also why we use eggs in the dredging process to make delicious fried chicken. Without the egg, the dough would not become cohesive and you would have weird clumps and layers in those cookies. You would also have flatter cookies since an incohesive dough will not stretch and expand enough to allow for adequate rising.

And since I talked about cookies I figure I ought to share my tried and true cookie recipe. When things get really rough at school, I make a batch from memory. It's usually about one a week :) Here's the recipe as I make it:

Cream together 1/2 cup butter and 1/2 cup butter flavored shortening in the electric mixer. While it's running:
  • Add 1/2 cup white sugar.
  • Add 1 cup brown sugar
  • Add 1 tsp vanilla, then another just because.
  • Add 1/2 tsp baking soda.
  • Add 1/2 tsp salt
  • Add 2 eggs
  • Add a good dash of cinnamon, maybe like a 1/4 tsp?? I really eyeball this one folks, you should see the cinnamon speckles in the batter.
Gradually add flour in a 1/2 cup at a time till your dough is cohesive, pulls away from the bowl, but is still kind of sticky. I usually need 2 1/2 to 3 cups. Stir in good quality chocolate chips, one bag (12 ounces).  Drop in even quantities on a baking sheet lined with parchment paper. DO NOT USE PAN SPRAY. Pan spray makes a layer of oil which essentially fries the bottom of the cookie and makes it greasy. Ew. Parchment paper all the way, once you start using it, you won't turn back! Bake at 375 degrees for 7-9 minutes. You want them just starting to turn golden brown on the tops and edges, just barely golden. Remove from oven and let them set on the tray for a couple of minutes. They will continue to brown a bit as the baking continues from internal heat.  Remove to a cooling rack to finish cooling or go ahead and risk your tongue for a warm cookie :)  Special note on equipment- I hate dishes so I use as little as possible. For a simple batch of cookies I use a 1/2 cup measure (for sugars and flour), a 1/2 tsp meaure (for everything else), a cookie scoop, and one baking sheet. I don't even use a spatula to remove the cookies, I just barehand them. That makes for a whopping 4 things to clean counting the mixing bowl and uncounting the baking sheet since it stayed clean since it was lined with the parchment paper. Wham, bam, thank you ma'am!
 

Thursday, October 18, 2012

Italian Meatballs

I made up this recipe based on several different ones found online when searching for a way to add meet to the pasta alla vodka meal.

The one that sounded most appealing was made with ground turkey. I replaced the turkey with a combo of ground beef and Italian sausage. I also doubled the recipe simple because I didn't want to store the leftover beef and sausage. Instead, I froze the unused meatballs and will use them later in life. :)

Here's the root recipe:
1/2 lb ground beef
1/2 lb Italian sausage
1 cup bread crumbs
1/2 cup Parmesan cheese
1 Tbsp Italian seasoning
1/2 Tbsp Worcestershire sauce
salt and pepper

From the get go I had to make some substitutions simply from lack of ingredients. I didn't have enough plain bread crumbs so I used the rest of the Italian bread crumbs I had on hand. That with the Italian sausage led me to leave the Italian seasoning amount at 1 Tbsp (instead of doubling it to 2). PS- I used my home-made Italian seasoning.

Cast of characters.

After dumping it all into the bowl, I quickly realized only hand mixing would do!

I rolled them out into 1 1/2 inch balls- this was completely random. I just made them about the sized I picture meatballs as being. I baked them in the oven on parchment paper at 375 degrees for about 25 minutes, turning them halfway through.

The remainder went onto another lined baking sheet to sit in the freezer just long enough to set up firm. Once I knew they wouldn't mash all together I dumped them into a freezer bag and sealed them up right.

The freezer tray was not nearly as neat and tidy as the baking tray.
 
 
I will admit that my first meatballs could have baked about less 5 minutes less than they did. With the sauce and pasta though, they were delightful! I can't wait to use my frozen ones for some meatball subs. Yum!

PS- this made about 36 meatballs.


Tuesday, October 16, 2012

Pasta alla Vodka

This post is going to have to happen in pieces.

The root of my desire was some pasta alla vodka that I always order at a local Italian restaurant. They serve their's with cheese tortellini and I decided to try my hand at making my own. I think it needed to have something good and meaty to go with it. The final result was Italian meatballs with cheese tortellini in vodka sauce. Yum!

The sauce recipe I found was from the Pioneer Woman. She's pretty handy in the kitchen so I figured I could trust her. Here's the root recipe:

1 medium diced onion
3 clove garlic, finely diced
3/4 cup vodka
1 can tomato puree
1 cup heavy cream
1/4 tsp salt
pinch red pepper flakes
1 Tbsp butter
pinch black pepper

I sauteed my onion and garlic before adding the vodka to simmer and reduce.

First error here- I'm a teacher and I cook on a shoestring budget. I used cheap vodka. Cheap vodka has stronger flavor and therefore needs to simmer and reduce longer to remove the vodka-ness of the taste. In the future I will honestly just use less vodka. I'm too cheap to shell out money for better stock although that would be the ideal solution.
Next I added the tomato and cream and did the summer and reduce thing some more.

This is much more "red" than the sauce was in reality- my bad flourescent kitchen lighting is not kind to photographs. And no, there isn't a window in my kitchen from which to utilize natural light.
Finally, because Pioneer Woman said so, I added the butter and adjusted the seasonings. A little longer on the simmer and reduce routine finished off the sauce.

I had made my meatballs beforehand and cooked my noodles while making the sauce. I used the pre-made fresh noodles you find packaged in the refrigerator unit at the store. I wasn't a huge fan sadly. I will probably try a couple of different varieties before giving up on convenience tortellini but I have kind of already decided to just use cheese ravioli next time. The sauce though was delicious.


Despite the changes I will make in future editions the meal was still delicious. And pretty!


Wednesday, August 29, 2012

Gringo Dip


For a long time I've been wanting to try my hand at making my own Gringo Dip (normally found at a favorite restaurant, 54th Street). After perusing various recipes, I finally chose the route I would take and made my own attempts. Since I was thinking like a blogger, I actually wrote down amounts as I added them!

First let me say that I didn't use a double boiler. I don't own one. I simply melted my cheese dip with a low temp and lots of patience on the stove. As long as you stir frequently and keep those temps low (my dial was on 4), then you should be OK.
 
Recipe:
4 oz pepper jack cheese, cubed
4 oz monterey jack cheese, cubed
4 oz Velveeta, cubed
1 cup half and half
3/4 cup pico de gallo
1/4 tsp cayenne pepper
2 tbsp parmesan cheese, grated
2 1/2 oz frozen chopped spinach

I put everything in the pot but the spinach and stirred until it was all smoothly melted. Then I added in the spinach and cooked until the spinach was all thawed and mixed in. It makes about 4 cups of cheese dip. We ate half the pot and I filled a 2-cup tupperware with leftovers.

How this compares to other recipes:
I used plain old yellow Velveeta so my cheese is more yellow than the original. You could buy the white Velveeta, but I just used what I had on hand. Also, I used way less spinach than other recipes call for. I don't care for spinach and simple tolerate it in recipes like this. Even still, Sig agreed that any more would have made for a spinach dip instead of a queso dip. This recipe is also much smaller in size than the other copy-cats I've seen.

What I will do different next time:
Sig likes his dips more spicy so I will probably add more pepper jack and take away some monty jack. You can always add more cayenne too (which is the type of heat I prefer). I initially thought I should use less half and half but my teacher brain kicked in to remind me that cheese sauces thicken upon standing. The consistency turned out perfect!

How much it cost:
Like me, you probably have the Velveeta, cayenne, and parmesan on hand. I bought fresh pico from the deli section for $3, monty jack and pepper jack cost me another $4, half and half was $2 and the spinach $1.50. The remaining pico will be used in recipes later this week, the remaining cheese will keep, and I'll make sure to use the half and half before it expires. I measured my spinach still frozen, so that remaining will keep in the freezer too. All in all it probably comes about $6 worth of ingredients.

And because we're piglets, the only photo I have to share is the one of the leftovers. This will probably be my very unhealthy lunch tomorrow!


*Please ignore my dirty stone- we had stuffed peppers for dinner with the dip. I promise it was cleaned appropriately!

Wednesday, August 15, 2012

Homemade Spice Mixes

I found this idea on Pinterest of course. I made my own taco seasoning, ranch seasoning, onion soup mix and Italian dressing mix. The first three came from Jamie over at Self-Reliance. The last came from a combination of places (I adjusted it to suit my own needs).

Taco seasoning is used for tacos of course (beef or chicken). The ranch seasoning can be used for ranch dressing, but I mostly use it to make ranch dip. The onion soup mix I use for dips and to flavor my pot roasts. The Italian dressing I use exclusively for seasoning buttered bread on any night we have pasta. This is the only time I use the seasoning but it happens at least once a week. Italian dressing is something I only use for marinade so I prefer the zesty version- not made with this seasoning mix.

I added up the amounts I needed and double-checked the quantities I had on hand in my spice cabinet. I ended up spending about $30 on spices, but I bought the large quantity size so I'm ready to make more mixes when I need it. I filled 2 pint jars each and used the little round canning sticker labels you can buy in the store (about $9 spent on the jars and labels). If I were gifting these then I would have made cuter labels with my Cricut. But for my own pantry, a handwritten sticker will do.


Ranch:
5 tablespoons dried minced onions
7 teaspoons parsley flakes
4 teaspoons salt
1 teaspoon garlic powder
 
Dry Onion Soup Mix:
2/3 cup dried, minced onion
3 teaspoons parsley flakes
2 teaspoons onion powder
2 teaspoons turmeric
1 teaspoon celery salt
1 teaspoon sea salt
1 teaspoon sugar
1/2 teaspoon ground pepper
 
Taco Seasoning:
1/2 cup chili powder
1/4 cup onion powder
1/8 cup ground cumin
1 tablespoon garlic powder
1 tablespoon paprika
1 tablespoon sea salt
 
Italian Dressing Mix:
I'll tell you when I find the paper I wrote it down on....
3/4 tsp garlic powder
2 1/4 tsp sea salt
1 tbsp onion powder
1 1/2 tbsp sugar
1 tbsp dried oregano
1 tbsp gound oregano
1 tsp pepper
1/4 tsp thyme
1 tsp basil
1 tbsp parsley
1/4 tsp celery salt
 
And ta-da! Healthy and convenient mixes I can simply spoon out at my pleasure. I keep a jar of each in my spice cabinet with the spare jars in the pantry. I'm about half-way through my first jar of the Italian already, and a third way through my taco. The ranch I've used minimally, but I have some potato recipes I'm going to play around with. The onion soup will get used the most heavily this fall when I'm making roasts again. It's simply too hot this summer for such a heavy meal!
Enjoy!


Monday, June 11, 2012

Better Poppyseed Dressing

So with all this madness with the new house, me moving to a new apartment, working like crazy, and being lazy, I don't work out much. I figure when I'm settled in the new town I'll figure out some fitness plan. In the meantime, I eat a lot of rabbit food and try to keep my diet in check. (Except that it's summer so that means I have a lot ice cream right now.) Not to mention, a cool salad on a hot day is my idea of perfect.

Now as far as salads go, I adore Panera. They rock my world, especially now that I get free stuff every time thanks to the myPanera card. But I can't afford to buy every rabbit meal I eat, therefore I cook. Since it's summer, Panera has their strawberry poppyseed salad available. As much as I love most of their salads (the Cobb, Caesar, and Asian are favorites of mine), this one doesn't do it for me. Because I've found a recipe one better. ;-)
First make this dressing, it should make enough for a few salads a week for lunch:
¾ cup sugar (or Splenda if you're like that)
1/3 cup cider vinegar (or you can use an apple balsamic)
1 tsp. salt
½ cup oil
1 tsp. dry mustard
½ tsp poppyseeds
Mix it all together and store in a covered container. If you get fancy you can actually buy salad dressing containers to keep your home-made dressings in. I want one (or three) but haven't actually found any I like yet. I'd love suggestions!
Then when lunch time comes, all you need to do is tear open a bag of romaine lettuce or spinach (use a dark colored leaf for maximum flavor and vitamins), slice up an apple and strawberries, toss in some walnuts, celery, and green onion, bada bing, bada boom, you've got a yummy summer salad.
I chop the strawberry, celery and green onions ahead of time and keep in another container ready to go. The apple I slice daily because I'll end up eating the whole apple.

It's a great meal because it tastes like summer (we all know how obsessed I am) but it has ingredients easily available during the winter. Not to mention you get two servings of vegetables and one serving of fruit in one meal. Fabulous!
*PS- this salad is super cute for Fourth of July, add some blueberries to make a red, white, and blue color splash.
*PPS- this is also good with chicken if you're looking for the protein. If I add chicken, I usually use some leftover rotisserie chicken because it's more salty (to balance with the sweet dressing).

Disclaimer- this isn't an "original" recipe. I have seen versions of it ALL over the place. I have no idea who the original creator is, they are a genius though.


Monday, May 21, 2012

Pot Roast Nachos

So I went to M&S Grill for my girl's night out. We had pot roast nachos and they were amazing. Such a simple concept right?! Pot roast on nachos instead of chicken. Easy peasy. And seeing as how I'm a foods teacher, I decided to conquer this piece of heavenly delight.

Originally I figured I would just wing it. I would by some big tortilla chips, spread them with pot roast, a little fresh pico (easily purchased in your grocery's deli department), sprinkle with cheese, and broil till melted and toasty. Easy right? Well I decided to investigate the web anyway just in case there was a copy-cat recipe out there.....and there was! It was a little more intense than I was figuring on so I hesitated, but I had the time, money, and inclination to take it on. Boy am I glad I did!

The secret is the aioli. I have never made one before so I was a little nervous. Fortunately this is kind of a cheater aioli and is pretty much just flavored mayo. I did, however, remember again why you should wear gloves when chopping peppers because that Serrano juice has been dangerously close to my eye more than once this evening. I also tried my hand at making my own chips, and while tasty they weren't as crispy as I desired. If I used store-bought chips I think the saltiness of the dish might be too high (I don't like salty). I discovered my problem was the tortillas I fried. I use flour and should have used corn.

My aioli tasted good but I had twice as much as I needed, it's very spicy so a little goes a long way, and mine was a little runny. Luckily it refrigerates and should keep for a while. In the future I'll use less lemon juice to make it a bit thicker (I didn't use any of the canola btw). I also sprinkled mine with a Mexican blend of cheese- I liked having the white and orange mixture but the seasonings weren't needed. The future versions will probably just have straight up cheddar. I also sauteed my vegetables like a good little FACS teacher, but it was stupidly time consuming so next time I'm just going to use the pre-made pico. It'll work. Now the pot roast- ideally you would use your left over roast. I don't have left over roast. When I make pot roast, we eat the whole thing. But I like "leftover" roast recipes so I've come across a cheater roast that's really good. It's the Hormel brand Beef Roast Au Jus and is super convenient. Not to mention pretty cheap. Here's the final product:
In case you can't tell- I couldn't wait to try a bite before taking the picture.

And here's the recipe, as found here:

Delicious Pot Roast Nachos

  • Time 20 minutes
  • Serves 4

Ingredients

  • 4 each 8 inch tortillas cut into quarters and fried
  • 2 cups leftover pot roast (rough chopped)
  • 1 cup chili aioli (see below)
  • 1 cup peppers, sliced and sautéed
  • 1 cup yellow onion, sliced and sautéed
  • 3 cups shredded cheddar or mixed cheese
  • For the Chili Aioli:
  • 1 jalapeño, seeded and diced
  • 1 Serrano chili, diced
  • 1 tsp. red pepper flakes
  • 1 tsp. minced garlic
  • 1/4 cup lemon juice
  • 1/2 cup mayonnaise
  • 1-2 Tbsp. canola oil
  • Sugar, to taste
  • Salt and pepper, to taste

How to make it

  • Lay tortillas flat on a baking sheet
  • spoon 1 tablespoon of chili aioli on each chip
  • divide the peppers and onions on all the chips
  • divide the pot roast on all the chips
  • divide the cheese on all the chips
  • broil until cheese is melted (about 5 minutes)
  • top with salsa and green onions and serve
  • For the Chili Aioli:
  • • In a food processor, combine the jalapeño, Serrano chili, red pepper flakes, and garlic until finely minced. Add the lemon juice and mayonnaise.
  • • Gradually add the canola oil until the mixture is slightly thinner than mayonnaise. Season with the sugar, salt, and pepper.
  • • Refrigerate until ready to use.