Monday, May 21, 2012

Pot Roast Nachos

So I went to M&S Grill for my girl's night out. We had pot roast nachos and they were amazing. Such a simple concept right?! Pot roast on nachos instead of chicken. Easy peasy. And seeing as how I'm a foods teacher, I decided to conquer this piece of heavenly delight.

Originally I figured I would just wing it. I would by some big tortilla chips, spread them with pot roast, a little fresh pico (easily purchased in your grocery's deli department), sprinkle with cheese, and broil till melted and toasty. Easy right? Well I decided to investigate the web anyway just in case there was a copy-cat recipe out there.....and there was! It was a little more intense than I was figuring on so I hesitated, but I had the time, money, and inclination to take it on. Boy am I glad I did!

The secret is the aioli. I have never made one before so I was a little nervous. Fortunately this is kind of a cheater aioli and is pretty much just flavored mayo. I did, however, remember again why you should wear gloves when chopping peppers because that Serrano juice has been dangerously close to my eye more than once this evening. I also tried my hand at making my own chips, and while tasty they weren't as crispy as I desired. If I used store-bought chips I think the saltiness of the dish might be too high (I don't like salty). I discovered my problem was the tortillas I fried. I use flour and should have used corn.

My aioli tasted good but I had twice as much as I needed, it's very spicy so a little goes a long way, and mine was a little runny. Luckily it refrigerates and should keep for a while. In the future I'll use less lemon juice to make it a bit thicker (I didn't use any of the canola btw). I also sprinkled mine with a Mexican blend of cheese- I liked having the white and orange mixture but the seasonings weren't needed. The future versions will probably just have straight up cheddar. I also sauteed my vegetables like a good little FACS teacher, but it was stupidly time consuming so next time I'm just going to use the pre-made pico. It'll work. Now the pot roast- ideally you would use your left over roast. I don't have left over roast. When I make pot roast, we eat the whole thing. But I like "leftover" roast recipes so I've come across a cheater roast that's really good. It's the Hormel brand Beef Roast Au Jus and is super convenient. Not to mention pretty cheap. Here's the final product:
In case you can't tell- I couldn't wait to try a bite before taking the picture.

And here's the recipe, as found here:

Delicious Pot Roast Nachos

  • Time 20 minutes
  • Serves 4

Ingredients

  • 4 each 8 inch tortillas cut into quarters and fried
  • 2 cups leftover pot roast (rough chopped)
  • 1 cup chili aioli (see below)
  • 1 cup peppers, sliced and sautéed
  • 1 cup yellow onion, sliced and sautéed
  • 3 cups shredded cheddar or mixed cheese
  • For the Chili Aioli:
  • 1 jalapeño, seeded and diced
  • 1 Serrano chili, diced
  • 1 tsp. red pepper flakes
  • 1 tsp. minced garlic
  • 1/4 cup lemon juice
  • 1/2 cup mayonnaise
  • 1-2 Tbsp. canola oil
  • Sugar, to taste
  • Salt and pepper, to taste

How to make it

  • Lay tortillas flat on a baking sheet
  • spoon 1 tablespoon of chili aioli on each chip
  • divide the peppers and onions on all the chips
  • divide the pot roast on all the chips
  • divide the cheese on all the chips
  • broil until cheese is melted (about 5 minutes)
  • top with salsa and green onions and serve
  • For the Chili Aioli:
  • • In a food processor, combine the jalapeño, Serrano chili, red pepper flakes, and garlic until finely minced. Add the lemon juice and mayonnaise.
  • • Gradually add the canola oil until the mixture is slightly thinner than mayonnaise. Season with the sugar, salt, and pepper.
  • • Refrigerate until ready to use.


Monday, May 14, 2012

In My Next Life I'll Be A Florist

The school in which I work recently held their prom- planned and coordinated by moi (and my fellow coworker K). This was our first year running the prom show and we were given two tasks: 1) Increase attendance and 2) Don't Go in Debt. Obviously if we increase attendance it helps with the debt thing because we have more money from ticket sales. We knew though that we wouldn't be able to up our sales enough this first year to completely make-up the gap in the budget amount. So we slashed our budget. By a few thousand dollars. YIKES!

One of the places we made the cut was the florist. We decided that as 2 handy females, we could manage the centerpieces ourselves. Instead of a $3000 budget line, we spent $300 on vases and another $300 on fresh blooms and fillers. The vases and fillers we can use again, only the fresh blooms are disposable product. Our kids chose peacock feathers as the guiding color/design scheme so we pulled them in where we could. To get the most bang for our buck, we used hydrangea blooms since they have a large "wow" factor per stem. In the end, we spent about $600 total for 20 centerpieces. It took us three hours to assemble the pieces, but everyone was impressed with our handiwork.

While I have certainly made simple vase arrangements before for my own home, I hadn't ever made multiple formal arrangements for a vase. I got comfortable with it though and don't foresee me hiring a florist anytime in the near future. I can do it by myself! Here are some pictures with tips (once again I apologize for photo quality, I was too occupied at the time to remember to grab my nice camera):

I call them "swizzles"- they're the twisty glittery twig things and add automatic sparkle and height to arrangements. Plus they're cheap and plentiful!

When we ran low on blooms, we just used the feathers we still had left to finish the last centerpieces. A few palm fronds (also cheap) make it look like a floral arrangement despite the lack of actual flowers


To get your palm fronds to go where you want, you can crease the stems. Press the stem gently against your fingernail to create a small crease without actually break the stem (then they just flop).

Wired ribbon is a must.

A visually stimulating vase with a small top means you can get away with using fewer actual blooms.

This was the general look of most our centerpieces- white flowers, sprig of peacock feathers, surrounded by candles.

On our feather vases we didn't bother adding water (the greenery keeps a long time before shriveling from lack of water). The inside of the vase though can look unnatural in these flower-less centerpieces so we ribbon wrapped them to hide the interior.

If you really need flowers to point in a certain direction, use floral foam. It's the green stuff that makes a huge mess. We avoided using it for that very reason, but you can make more multidirectional arrangements if you do.


Friday, May 11, 2012

Name Plates

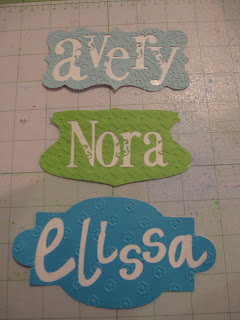
Here are some name plates I made for a friend. She wanted the pieces to go inside some books she was giving her granddaughters. She provided the paper and left the rest up to me. I used my Cricut to cut the shapes and names. Then I ran them through my Cuttlebug for some texture. The only error I made was when I stuck adhesive on the back with my tape gun- forgot about the cut-out parts where the tape would show. I got most of it scraped away though so there shouldn't be major issues.


All the shapes came from the Sophisticated cartridge as well as Avery and Nora. Elissa was cut from the Designer's Calendar cartridge. I used Cricut Craft Room to design it all and tried to keep the plates in the 3x5 inch range (Elissa had to be a little bigger to her her name to fit).  Here's some closer shots:


Wednesday, May 9, 2012

Glue Gone Bad

Hey fellow scrapbookers- I'm sure when I say "glue gone bad" you know exactly what I mean. We've all been there. Glue that makes pages nasty and wrinkly, doesn't adhere strong enough, discolors, etc. It's a pain plus a disappointment.
Well I decided to make a calendar for my mother for Christmas. I used old photos of my sisters and I and decorated each page for each month. I am most definitely aware that you can do this all digitally now, but I'm a paper and glue scrapper. I knew also, that this was a fairly cheap kit, and that this wouldn't be a calendar to last the ages. My plan ultimately was to let her enjoy it for the year and then I have an album ready to stick the pages in at the end of the year. A sort of seasonal memories scrapbook if you will.

Unfortunately, I was put in a tough spot with adhesives and ended up buying off-brand glue. BAD IDEA! I have always used the Elmer's Craft Glue and been please enough (all liquid glue results in some wrinkling but glue sticks don't). The off-brand stuff I got though was worse than I had ever seen or used before. Check this out


Ugly rippling keeps the pages from laying flat which triples the whole size of the calendar. Oh well, Mom loved it anyway and once in an album it won't be as noticeable. My lesson was learned though, and at the advice of Missy, I purchased a tape gun. Mine is the Scotch Advanced Tape Glider and was definitely a wise investment!
Example of one of the pages- August was the Florida to page to commemorate all our summer trips to Destin. Although, we normally spent August starting school and then went to Florida in September. The calendar felt awkward though having a fall-like page in the middle of very summery pages. So I used artistic license and did Florida in August and school in September.

*PS- sorry for the crummy photos. My good camera's battery was dead so I was left using the old point-and-shoot. :)

Thursday, May 3, 2012

Tools of the Trade- Scrapbook Edition

Here are some of my favorite scrapbook tools. I don’t necessarily use them all the time, but they are some of my favorite, fun tools to utilize.


1) Cricut Expression machine

It’s a Cricut- need I say more?! Ok, I know some of you all don’t use electronic die cut machines, but I do and I love it. I use Cricut Craft Room with mine. It works similar to the gypsy but it’s free. I think there are some things on the Gypsy you can do that aren’t included on Craft Room but I haven’t felt the need to buy a Gypsy yet. I register all my cartridges with Craft Room so I don’t have to physically install them to cut from them. If you don’t want to register your carts (because you can only register them once), you can use a Jukebox to let you cut from multiple carts at one time. Craft Room is supposed to be hooking up with Gypsy soon so you won’t suffer from registering your carts to one or the other. Your accounts will be linked, so once registered you can cut from that cart with either design tool. I haven’t paid too much attention to this development because I don’t have a Gypsy. Maybe eventually.


2) Cuttlebug embosser

You can use your Cuttlebug to die-cut also but I only use mine as an embosser. There are lots of different embossing folders, including ones designed to coordinate with some Cricut cartridges. You can use folders (or dies for that matter) from any of the major machine brands (Sissix, Spellbinders, etc). One thing about my Cuttlebug is that I wish I would have bought the embossing machine to go with my letterpress kit.  I already had the Cuttlebug before the letterpress so that’s just what I use. I don’t want to have two of the same type of machine. The result though is that I have to use multiple layers of paper to get the impressions right.


3) L Letterpress Machine

This is the only Letterpress kit of its kind on the market. I don’t use it super frequently because it’s kind of a messy business. But when I need that something special to put my project over the edge, letterpress usually does it. There are several different plates you can use and Lifestyle Crafts is even developing a way to order custom plates. The tool is meant to be used with Lifestyle Epic 6 machine which is what I now wish I had instead of my Cuttlebug. But I make do and still get good results. If this is something you want to get into, you’re in luck- the starter kit is now available at Jo-Anns! When I was buying mine it was sold out for Lifestyle’s website and the few stores that carried it didn’t have it in stock. I ended up getting mine on Amazon. Archivers carries the Letterpress materials also.


4) Lifestyle Crafts Quickstick

Remember ticky-tacky? Well this tool has a ticky-tacky tip on one end and then a couple of acrylic tips for the other. This has solved my problems of dealing with tiny embellishments. You pick them up with the tacky end then use the acrylic part to pull it off. You can pick up the small piece, dab your glue on the back, and set it down on your page wherever you desire- all without getting any glue on your fingers or ruffling the embellishment!


5) Cutterpede Straight Edge Trimmer

I use this to trim down all my paper pieces, well for everything. I like Cutterpede because it’s just always served me well. They have different decorative blades you can use- like wavy edge or perforated. Their stuff is really affordable which I appreciate since cutting blades do have to be replaced fairly regularly.


Other items that deserve honorable mention:

·         Scotch Tape roller- kiss massive amounts of glue goodbye!

·         Embossing heat tool

·         ZIG markers (by EK Success)

Tuesday, May 1, 2012

Tools of the Trade- Kitchen Addition

These are my kitchen tools that get used just about all the time. I have lots of gizmos and gadgets, but I don’t use every specific tool each time I cook. A lot of times I just make do with my favorite ones.


1) KitchenAid Professional Lift-Stand mixer

What’s not to love?! I adore my mixer, especially now that I have the flat-head beater with spatula edges, no more scraping the bowl! I don’t have many attachments, only the ice cream maker now, but I’ve got my eye on the pasta roller or meat grinder next. My only complaint with the lift-stand mixers is that you only have a stainless steel bowl option, the tilt-head versions have a glass bowl you can purchase as an accessory.


2) Silicone flex mixing bowl

This was a gift one year for Christmas and I was skeptical. I’ve never been a fan of silicone bakeware but I decided to give this bowl a try. The reason why I love it is because you can flex the sides to pour out of it easily. My stainless steel mixing bowls (with rubber grip bottoms) don’t have a pour spout so pouring out of them can be tricky. I really like using this one for pour batter recipes like pancakes because I can mix and pour out of the same bowl. Plus it’s dishwasher safe!


3) Mini spatulas

Mine are from Williams and Sonoma, but you can find these just about anywhere. They are the best for scraping out of small containers. A good rubber spatula (especially the scoop kind) is a must-have kitchen basic, but I find myself using the smaller varieties even more.


4) Pampered Chef large round stone with handles

This one had to do battle with my Pampered Chef stone bar-pan to earn this spot. But, the bar pan does actually get put away, the round stone (affectionately called the pizza stone in my household) doesn’t ever leave the stove or counter top. I prefer to bake on stoneware when I can, and we use this stone for everything- baking, reheating, pizzas, big piles of nachos, you name it. One trick I’ve learned with your stones is using them to help bread dough rise. They work because they hold heat so well and stay warm so long. I’ll heat mine in the oven then place the hot stone either near or under my bowl of rising dough and it creates a nice warm environment to get that yeast working.


5) Kitchen Shears

I cut my pizza with kitchen shears, aka scissors. It’s weird but true. I also “chop” my green onion by snipping them with my shears. Ditto with chicken. I know how to use a knife, but I’m much savvier with scissors. So anything that is in a strip-like shape and needs to be chopped or diced, I forgo my kitchen knives and use my shears. I also use them for opening various food packages. My favorite pair actually comes apart like salad tongs and is dishwasher safe (easy to clean!)


Some other tools that earned honorable mention:

·         My stone bar-pan

·         Garlic press

·         Pampered Chef Mix-n-Chop tool (for ground meats)

·         Glass prep bowls